
GPIO, Input & Output GUI panel using Tkinter
The article guides you through Designing a Graphical panel to control all the 21 GPIO’s of Raspberry Pi as an Input or Output Pin.

- Open the python IDLE in Raspberry Pi and create a new Python file and enter the following code.
#This code has been published by Robu.in
#visit https://robu.in for more information

import sys

if(sys.version_info[0]<3):
  from Tkinter import *
else:
  from tkinter import *

import RPi.GPIO as pi
import math
#import tkSimpleDialog

class LED(Frame):
"""A Tkinter LED Widget.
a = LED(root,10)
a.set(True)
current_state = a.get()"""
OFF_STATE = 0
ON_STATE = 1

   def __init__(self,master,size=10,**kw):
      self.size = size
      Frame.__init__(self,master,width=size,height=size)
      self.configure(**kw)
      self.state = LED.OFF_STATE
      self.c = Canvas(self,width=self['width'],height=self['height'])
      self.c.grid()
      self.led = self._drawcircle((self.size/2)+1,(self.size/2)+1,(self.size-1)/2)
   def _drawcircle(self,x,y,rad):
       """Draws the circle initially"""
       color="red"
       return self.c.create_oval(x-rad,y-rad,x+rad,y+rad,width=rad/5,fill=color,outline='black')
   def _change_color(self):
       """Updates the LED colour"""
       if self.state == LED.ON_STATE:
          color="green"
       else:
          color="red"
       self.c.itemconfig(self.led, fill=color)
   def set(self,state):
       """Set the state of the LED to be True or False"""
       self.state = state
       self._change_color()
   def get(self):
       """Returns the current state of the LED"""
       return self.state

## Future Functionality
##class gpioEdit(tkSimpleDialog.Dialog):
## """Dialog to be expanded to support advanced gpio features like
## - Pull Up / Pull Down Resistor Config
## - Debounce"""
## def __init__(self, master,gpio):
## top = self.top = Toplevel(master)
## if gpio.isInput():
## title = "Edit Input: %s" %(str(gpio.name))
## else:
## title = "Edit Output: %s" %(str(gpio.name))
## l = Label(top,text=title)
## b = Button(top, text="Submit", command=self.submit)
##
## l.grid(row=0)
## b.grid(row=1)
##
## def submit(self):
## print("Submitted")
## self.top.destroy()

class GPIO(Frame):
   """Each GPIO class draws a Tkinter frame containing:
   - A Label to show the GPIO Port Name
   - A data direction spin box to select pin as input or output
   - A checkbox to set an output pin on or off
   - An LED widget to show the pin's current state
   - A Label to indicate the GPIOs current function"""
   gpio_modes = ("Passive","Input","Output")

   def __init__(self,parent,pin=0,name=None,**kw):
      self.pin = pin
      if name == None:
         self.name = "GPIO %02d" % (self.pin)
         Frame.__init__(self,parent,width=150,height=20,relief=SUNKEN,bd=1,padx=5,pady=5)
         ##Future capability
         ##self.bind('<Double-Button-1>', lambda e, s=self: self._configurePin(e.y))
         self.parent = parent
         self.configure(**kw)
         self.state = False
         self.cmdState = IntVar()
         self.Label = Label(self,text=self.name)
         self.mode_sel = Spinbox(self,values=self.gpio_modes,wrap=True,command=self.setMode)
         self.set_state = Checkbutton(self,text="High/Low",variable=self.cmdState,command=self.toggleCmdState)
         self.led = LED(self,20)
         self.Label.grid(column=0,row=0)
         self.mode_sel.grid(column=1,row=0)
         self.set_state.grid(column=2,row=0)
         self.current_mode = StringVar()
         self.led.grid(column=3,row=0)

         self.set_state.config(state=DISABLED)
         function = self.getPinFunctionName()
         if function not in ['Input','Output']:
            self.mode_sel.delete(0,'end')
            self.mode_sel.insert(0,function)
            self.mode_sel['state'] = DISABLED

## def _configurePin(self, y):
## """Future capability to setup pull up/down"""
## new = gpioEdit(self.parent,self)

    def isInput(self):
       """Returns True if the current pin is an input"""
       return (self.mode_sel.get() == "Input")

    def setMode(self):
        """Sets the GPIO port to be either an input or output
       Depending on the value in the spinbox"""
       if (self.mode_sel.get() == "Input"):
          self.set_state.config(state=DISABLED)
          pi.setup(self.pin,pi.IN)
       elif (self.mode_sel.get() == "Passive"):
          self.set_state.config(state=DISABLED)
          pi.cleanup(self.pin)
       else:
          self.set_state.config(state=NORMAL)
          pi.setup(self.pin,pi.OUT)
          self.updateInput()

    def getPinFunctionName(self):
        pin = self.pin
        functions = {pi.IN:'Input',
                     pi.OUT:'Output',
                     pi.I2C:'I2C',
                     pi.SPI:'SPI',
                     pi.HARD_PWM:'HARD_PWM',
                     pi.SERIAL:'Serial',
                     pi.UNKNOWN:'Unknown'}
        return functions[pi.gpio_function(pin)]

## Future Functionality
## def setPullUp(self,pullup):
## """Defines the GPIO as having a pull up resistor so the input
## state is inverted when read
## setPullUp(True) - Pin is pulled up
## setPullUP(False) - Pin is not pulled up"""
## self.pullup = pullup

   def toggleCmdState(self):
      """Reads the current state of the checkbox, updates LED widget
      and sets the gpio port state."""
      self.state = self.cmdState.get()
      self.updateLED()
      self.updatePin()

   def updatePin(self):
      """Sets the GPIO port state to the current state"""
      pi.output(self.pin,self.state)

   def updateLED(self):
      """Refreshes the LED widget depending on the current state"""
      self.led.set(self.state)

   def updateInput(self):
      """Updates the current state if the pin is an input and sets the LED"""
      if self.isInput():
         state = pi.input(self.pin)
         self.state = state
         self.updateLED()

class App(Frame):
   def __init__(self,parent=None, **kw):
      Frame.__init__(self,parent,**kw)
      self.parent = parent
      pi.setmode(pi.BCM)
      self.ports = []
     ## Get the RPI Hardware dependant list of GPIO
     gpio = self.getRPIVersionGPIO()
     for num,(p,r,c) in enumerate(gpio):
         self.ports.append(GPIO(self,pin=p))
         self.ports[-1].grid(row=r,column=c)
         self.update()

   def onClose(self):
       """This is used to run the Rpi.GPIO cleanup() method to return pins to be an input
       and then destory the app and its parent."""
       try:
           pi.cleanup()
       except RuntimeWarning as e:
           print(e)
           self.destroy()
           self.parent.destroy()

    def readStates(self):
        """Cycles through the assigned ports and updates them based on the GPIO input"""
        for port in self.ports:
            port.updateInput()

    def update(self):
        """Runs every 100ms to update the state of the GPIO inputs"""
        self.readStates()
        self._timer = self.after(100,self.update)
   def getRPIVersionGPIO(self):
       """Returns the GPIO hardware config for different Pi versions
       Currently supports layout 1 and 3"""
       gpio1 = ((0,0,0),
                (1,1,0),
                (4,2,0),
                (17,3,0),
                (21,4,0),
                (22,5,0),
                (10,6,0),
                (9,7,0),
                (11,8,0),
                (14,0,1),
                (15,1,1),
                (18,2,1),
                (23,3,1),
                (24,4,1),
                (25,5,1),
                (8,6,1),
                (7,7,1))
       gpio2 = ((2,0,0),
                (3,1,0),
                (4,2,0),
                (17,3,0),
                (27,4,0),
                (22,5,0),
                (10,6,0),
                (9,7,0),
                (11,8,0),
                (14,0,1),
                (15,1,1),
                (18,2,1),
                (23,3,1),
                (24,4,1),
                (25,5,1),
                (8,6,1),
                (7,7,1))
       gpio3 = ((2,0,0),
                (3,1,0),
                (4,2,0),
                (17,3,0),
                (27,4,0),
                (22,5,0),
                (10,6,0),
                (9,7,0),
                (11,8,0),
                (5,9,0),
                (6,10,0),
                (13,11,0),
                (19,12,0),
                (26,13,0),
                (14,0,1),
                (15,1,1),
                (18,2,1),
                (23,3,1),
                (24,4,1),
                (25,5,1),
                (8,6,1),
                (7,7,1),
                (12,8,1),
                (16,9,1),
                (20,10,1),
                (21,11,1))
   if pi.RPI_REVISION == 3:
      gpio = gpio3
      self.parent.title('Raspberry Pi GPIO - A+/B+/2B+')
   elif pi.RPI_REVISION == 2:
        #Change this when I know the pins on RPi GPIO Version 2
        gpio = gpio2
        self.parent.title('Raspberry Pi GPIO - A/B Rev2')
   elif pi.RPI_REVISION == 1:
        self.parent.title('Raspberry Pi GPIO - A/B')
        gpio = gpio1
   else:
        self.parent.title('Raspberry Pi GPIO - Unknown Version')
        ##Assume same config as A+/B+/2B+
        gpio = gpio3
        return gpio

def main():
    root = Tk()
    root.title("Raspberry Pi GPIO")
    a = App(root)
    a.grid()
    """When the window is closed, run the onClose function."""
    root.protocol("WM_DELETE_WINDOW",a.onClose)
    root.resizable(False,False)
   root.mainloop()

if __name__ == '__main__':
   main()
- Now save the program. We are saving it as gpio.py python file.
Step 2 - Running the program and Understanding the GUI panel
- Now open terminal and type command sudo python gpio.py to run the program.
- A panel window will open up like this -
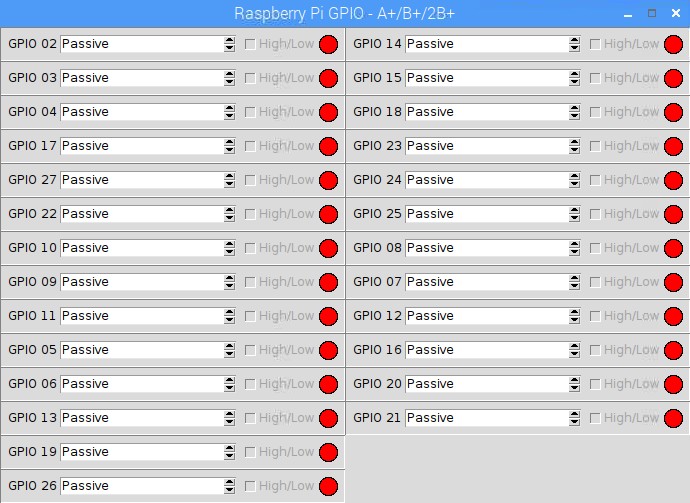
- From here you can set the status of any GPIO pin from the Corresponding drop down menu as Passive, Input or Output.
- If you have selected Output, then you will have to mark or unmark the corresponding High/Low box to make the Pin Low or High
- If you have selected Input, then the low Input will show the the Red colour and if input is high, it will show Green Colour.
About Robu
India's biggest robotics E-commerce company. Robu deals with Arduino, Raspberry Pi, Sensors, Drone parts, 3D printer parts, E-bike accessories and Electronics components etc. Click here to explore range of Robotics products available at Robu. Also, do not forget to follow us on Facebook, Instagram and YouTube because we are constantly contributing to the community by creating content around Arduino, Raspberry Pi, Drones, Sensors etc.
Related Posts

EASY DIY - RFID Door Lock
Friday December 29, 2023 581 Views
Today we’re going to build an RFID Door Lock based using Raspberry Pi Pico. Also we’ll be storing all the RFID Card’s code locally on a SD card for easy... Read More

IR (Infrared) And PIR Motion Sensor With Arduino And With Raspberry PI
Saturday April 25, 2020 5716 Views
In this blog, we discuss the types of infrared sensors and interfacing of IR sensor with Raspberry Pi 4 and Arduino board. ... Read More

How To Connect Raspberry Pi 4 To Relay
Wednesday March 11, 2020 9745 Views
Understand the interfacing of the 5v, 12v, 24v relay module with the Raspberry Pi GPIO and the code for the same. ... Read More
Exploring Minecraft on Raspberry Pi 5: A Step-by-Step Guide
Tuesday January 23, 2024 1514 Views
Enter the world of Minecraft with the power of Raspberry pi 5,Each of us has used this method to test the system’s performance, that is, to install a high-end game... Read More
